VT, also called Virtualization technology, is a technology that provides the ability to run multiple, isolated operating systems on a single piece of server hardware allowing a much higher level of resource utilization. It's necessary to enable VT because it could improve the performance of your computer and allow NoxPlayerZ to run more smoothly and faster.
In this tutorial, you will be informed of:
- How to check if VT is enabled
- Steps to enable VT
- Solutions to possible issues
1. How to check if you have enabled VT?
There are 3 ways to check:
- Check your system info
- The pop-up window when launching games
- Use the tool “LeoMoon”
First Method:
Check your system info. NoxPlayerZ will automatically check if your PC enables VT.


Second Method:
When you launch games that need VT service, NoxPlayerZ will automatically inform you.
Third Method:
Use a third-party tool called LeoMoon CPU-V. It not only detects if your CPU supports Hardware Virtualization, but also checks if Hardware Virtualization is enabled in BIOS.
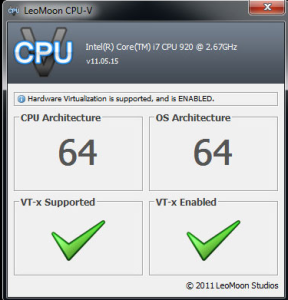
If your check result shows a green checkmark under VT-x Supported, it means your computer supports virtualization. If it’s a red cross, then your computer does not support VT, but you could still install NoxPlayerZ as long as you meet the installation requirements.
If your check result shows a green checkmark under VT-x Enabled, it means VT is already enabled in your BIOS. If it’s a red cross, then follow the following steps to enable it.
2. How to enable VT?
Follow these 3 steps to enable VT:
- Find out your BIOS type
- Enter BIOS interface
- enable VT
Step 1. Check your system information in NoxPlayerZ and find out your computer model or BIOS type.

Step 2. Enter the BIOS interface: Reboot your PC first, then while rebooting, press the shortcut Delete/ F12 (or the proper shortcut for your computer model) continuously to enter the BIOS interface.
Note: if the keyboard shortcut Delete/ F12 don't work or you are using a special computer model, please search for the effective way to enter BIOS interface. For example, in my case I could search for “How to enter BIOS for LENOVO-81J8”
Step 3. Enable VT
- Find the corresponding VT option on the BIOS page. (Mostly called Virtual or Virtualization, in some cases VT-X or SVM)

- Click Advanced >> Processor (CPU) >> Virtual or Virtualization, for some computers, VT is under Configuration or Security.
- Set the VT option to Enabled.
- Press Save (usually F10) or Exit Saving Changes to save and exit (Save & Exit).

3. Solutions to possible issues:
You might encounter:
- VT and Microsoft conflict
- anti-virus block
Note 1: If you are running Windows 8 or Windows 10, there might be conflicts between VT and Microsoft Hyper-V technology.
Please turn Hyper-V off following these steps: go to Control Panel >> Programs and Features >> Turn Windows features on or off >> un-tick the box before Hyper-V.


Note 2: If your VT is enabled in BIOS, but the LeMoon check result still shows a red cross under VT-x Enabled, it’s highly possible that your anti-virus software has blocked this function. Taking Avast! for example, to fix this problem:
- Open Avast anti-virus >> Settings >> Troubleshooting
- Uncheck the Enable hardware-assisted virtualization, then reboot your computer.
